Your first game
In this guide, we'll walk you through the process of creating a basic game scenario using Upside Engine, a framework for Roblox 2d game development.
Tip
In this guide we are going to use Offset, scale should never be used for a 2D game, as it is problematic on some devices, it is recommended that when building your game you use 1920x1080 resolution in the device emulator as it will adapt to most devices.
Step 1: Setting up the scene
The first thing we need to do is to create a scenario for our game. To do this, we'll use the Scene object, which is a useful tool for creating scenarios quickly and easily.
Warning
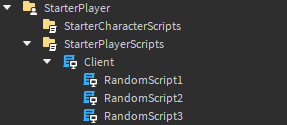
If you are using roblox studio, the scripts with "init" as name works different, means that all the scripts in the same directory are gonna be children of that script, so to explain it easier, just create a local script named "Client" in StarterPlayerScripts and place any module script as a children of it.
example:
In your init.client.luau script, add the following code:
local replicatedStorage = game:GetService("ReplicatedStorage")
local tweenService = game:GetService("TweenService")
local players = game:GetService("Players")

local packages = replicatedStorage.packages
local playerGui = players.LocalPlayer:WaitForChild("PlayerGui")

local upsideEngine = require(packages.UpsideEngine)
local screen = Instance.new("ScreenGui")
screen.Name = "MyGame"
screen.IgnoreGuiInset = true
screen.Parent = playerGui

local scene = upsideEngine.new("Scene")
scene.Instance.Parent = screen
scene:SetName("MyFirstScene") -- We set the scene name
scene:Enable() -- We mark as enabled the scene
Step 2: Creating the floor
Now that we have our scene set up, we can create a floor for our game. To do this, we'll use the PhysicalObject object.
local leftFloor = upsideEngine.new("PhysicalObject")
leftFloor.Anchored = true
leftFloor:SetScene(scene)

local lfInstance = leftFloor.Instance
lfInstance.Image = "rbxassetid://12980969571" -- We set the floor texture
lfInstance.Size = UDim2.fromOffset(600, 160) -- We set the size to 600x160 pixels
lfInstance.Position = UDim2.fromOffset(300, 1000) -- We set the position to 300x1000 pixels

local rightFloor = upsideEngine.new("PhysicalObject") -- We create the floor and pass the scene as the parent object
rightFloor.Anchored = true
rightFloor:SetScene(scene)

local rfInstance = rightFloor.Instance
rfInstance.Image = "rbxassetid://12980969571" -- We set the floor texture
rfInstance.Size = UDim2.fromOffset(600, 160) -- We set the size to 600x160 pixels
rfInstance.Position = UDim2.fromOffset(1620, 1000) -- We set the position to 1620x1000 pixels
Step 3: Creating a background
Next, let's add a background to our game. This time we'll use another PhysicalObject object, but we'll set it up a little differently.
local background = Instance.new("Frame")
background.BackgroundTransparency = 0 -- We set the background transparency
background.BackgroundColor3 = Color3.fromRGB(27, 62, 82)
background.Size = UDim2.fromScale(1, 1) -- We set the size to the target screen size
background.Position = UDim2.fromOffset(0.5, 0.5) -- We set the position to the center
background.ZIndex = -1
background.Parent = scene.Instance.Parent
Step 4: Adding decoration
Next, let's add a the decoration to our game. This time we'll use another PhysicalObject object, but we'll set it up a little differently.
local decoration = upsideEngine.new("PhysicalObject") -- We create the decoration and pass the scene as the parent object
decoration.TrackCollisions = false
decoration:SetScene(scene)

local decInstance = decoration.Instance
decInstance.Image = "rbxassetid://12993235175" -- We set the decoration texture
decInstance.Size = UDim2.fromOffset(1920, 1080) -- We set the size to the target screen size
decInstance.Position = UDim2.fromOffset(960, 540) -- We set the position to the center
decInstance.ZIndex = 0
Step 5: Creating platforms
Finally, let's create some interactive platforms for our game, we will create a platform that falls once it detects a collision.
-- Create platform object and set properties
local function createPlatform(x, y)
    local position = UDim2.fromOffset(x, y)
    local platform = upsideEngine.new("PhysicalObject")
    platform:SetScene(scene)
    platform.Mass = 0
    platform.Anchored = false

    local platInstance = platform.Instance
    platInstance.Image = "rbxassetid://12979703349"
    platInstance.Size = UDim2.fromOffset(250, 80)
    platInstance.Position = position
    platInstance.ZIndex = 2

    -- Create Tween to animate platform to its original position on collision
    local info = TweenInfo.new(1)
    local goal = { Position = position }

    local toOrigin = tweenService:Create(platform.Instance, info, goal)
    local falling = false
    toOrigin.Completed:Connect(function()
        falling = false
    end)

    -- Listen to the "Collision" event
    platform:On("Collision", function(object) -- Create a function to detect when the plaform collides
        if not object:IsA("Character") or falling then
            return
        end

        task.wait(1)
        falling = true
        platform.Mass = 200

        task.wait(5)
        platform.Mass = 0
        platform.Force = Vector2.zero

        toOrigin:Play()
    end)
end

createPlatform(800, 900)
createPlatform(1120, 900)

for _, scr in script:GetChildren() do
    require(scr) --Initializate the secondary scripts
end